Info@ybm.support

ybm_logo_neu_2024

OUR SUPPORT HELPS INFORM YOURSELF IN THE WIKI CREATE A TICKET

Search

Configure JTL – CSV import and export

You want to use BarcodeShipping in conjunction with JTL, but have several shipping stations in your logistics. You can use the JTL CSV import/export function so that BarcodeShipping ensures that the shipping label is printed at the station from which it was requested.

In the situation described, the database connection to JTL can no longer function for technical reasons. However, the database connection works very well if you only work with one woirking station.

The following description only works if you use the WMS module in JTL.

Preparations

Create a folder for the CSV export and import files that is located under a data carrier such as C:\ (or another data carrier that you always have access to).

First create a parent folder called “BCS CSV”, for example. Then create two further folders in this folder, which you name “in” and “out”.

Create export template in JTL

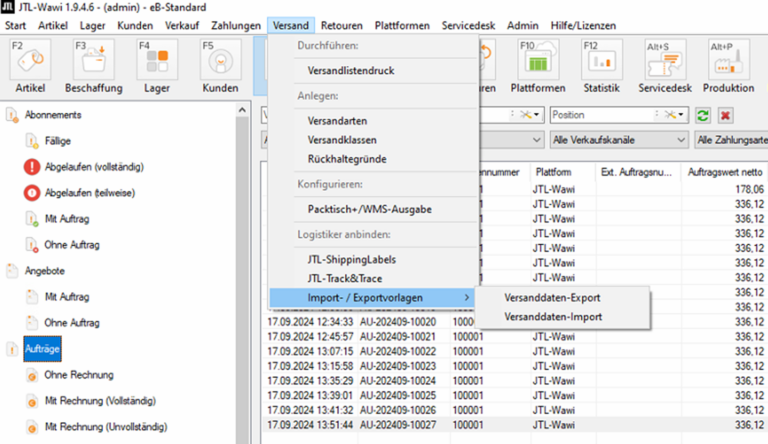
To create the export template, open the “JTL-Wawi” programme and navigate to “Shipping / Import / Export templates” at the top. There you first open the shipping data export.

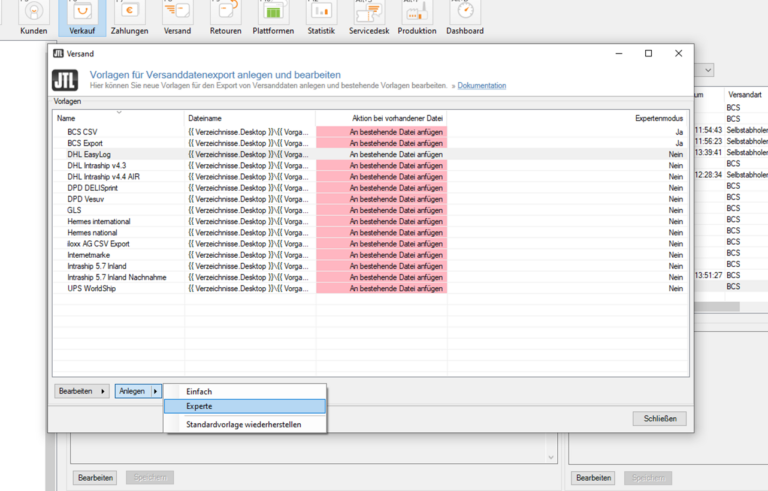
In the following window you will see an overview of the export templates that have already been created. Now click on the small black arrow of the “Create” button at the bottom of the window and select “Expert”.

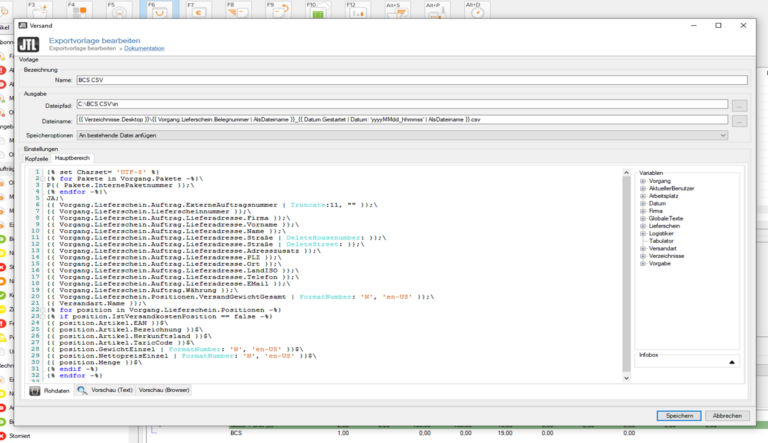
In the window that now opens, enter a meaningful name for the new template under “Name“.

Under “Output”, first enter the file path in which JTL should save the CSV file(s). Here you select the “in” folder described and prepared above.

In the next step, enter a few command lines for configuration under Settings / Header and Settings / Main area.

Download our template file:

(The file can be opened in any text editor).

Select and copy the line “Reference number;Returns label; ….” (for the header) into the clipboard with “Ctrl + C”. Paste it into the above window under Header and save.

Then copy the command lines for the main area from the template file and paste them into the above window under the Main area tab and save.

Create import template in JTL

To create the import template, open the “JTL-Wawi” programme and navigate to “Shipping / Import / Import templates” at the top. Open the shipping data import there.

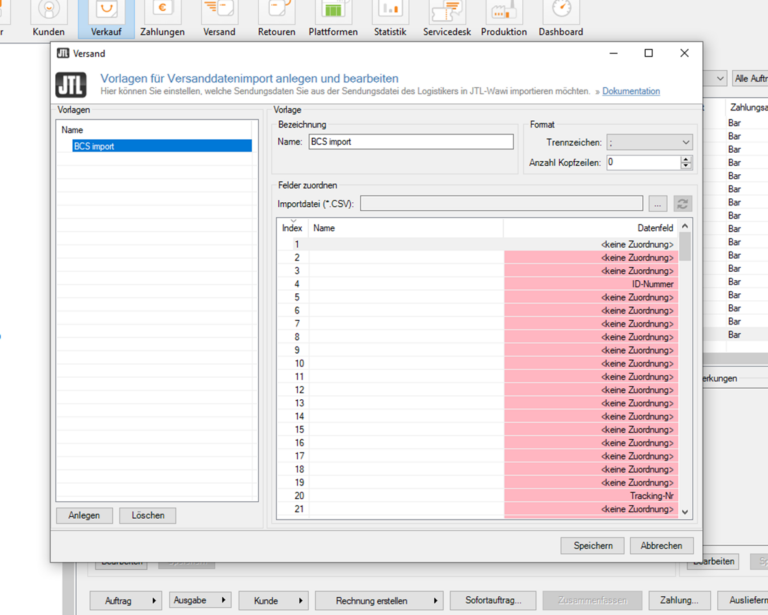
You can create a new import template in the following window. To do this, click on “Create” in the bottom left-hand section of the window.
Then enter a meaningful name at the top under “Name”.
Under “Format” please select the semicolon separator.
In the “Assign fields” area, you must select “ID number” in line 4 and “Tracking no.” in line 20.
In all other lines <remains no assignment>. Then click on “Save”.

Configure shipping methods

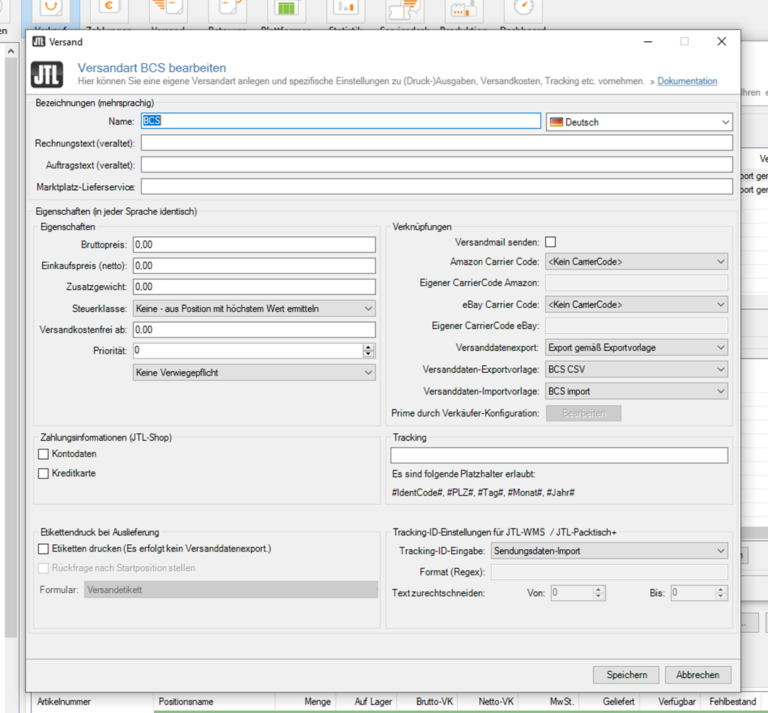
In the next step, you must configure your shipping methods so that the CSV templates you have just created are used when creating a shipment (e.g. via the packing table).
Navigate via Shipping / Shipping methods and select the desired shipping method. Then click on “Edit”.
You must make the following settings in the window that opens:
On the right-hand side of the window, under Links, you will find the Export shipping data setting and select “Export according to export template”.
Two further points will then appear below this, in which you must now select your shipping data export and shipping data import template.
In the Tracking ID settings area (below), select “Import shipment data” under Tracking ID input.
Don’t forget to save!

Configure JTL WMS/P+

The WMS must now be set up for the corresponding JTL user at each shipping station on which BarcodeShipping is to run:
Start the “JTL WMS/P+” programme.
Then select the “Shipping data exchange” field under “Settings“.
Select “Create” in the window that opens.
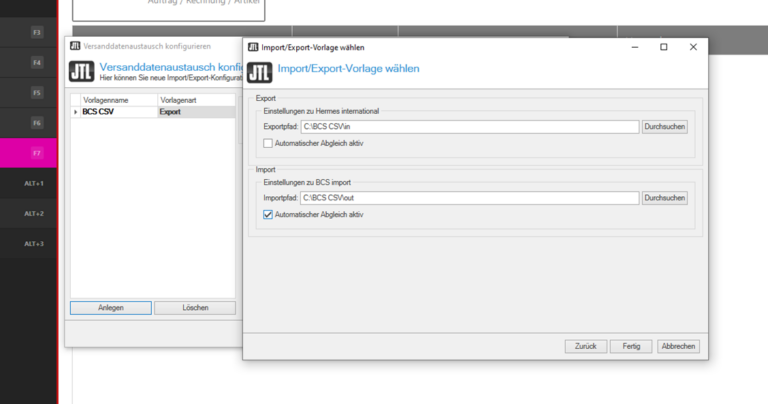
In the next window that opens, select the desired export/import template.
Then click on “Next”.
Select the “in” folder for the export path and the “out” folder for the import path.
IMPORTANT!
Tick the “Automatic synchronisation active” box for the import path!
Otherwise the automatic import for the tracking number will not work.
Then click on “Done” and then on “Save”.

Configure BarcodeShipping

Finally, CSV batch processing must be configured in BarcodeShipping.
For the sake of simplicity, we are providing you a conf file that matches the JTL configuration you have just set up.
Simply download the file and place it in the BarcodeShipping working directory in the corresponding profiles.
Simply unzip after downloading.
Open the working directory via the BarcodeShipping “Help” menu.
Windows Explorer opens and shows the contents of the “.barcodeshipping” folder.
Open the “config” folder. The folders in this folder are your profiles created in BarcodeShipping.
Open the appropriate profile folder and place the file you have just downloaded and unzipped into it.
Restart BarcodeSipping.
Done!